WEEK 01 / GIT + GITHUB + VS CODE
Git & GitHub
collaboration.
One story. Two contributors.
Let’s get everyone on the same branch of the story.
Set up your workspace
You’ll build The silent station, a tiny Markdown adventure. Mara creates a forest path. Leo creates a tower path. You’ll bring both into one story, then repeat the workflow with a small edit.
Your starting checklist
- Have VS Code, Git, and a GitHub account ready.
- Use your established GitHub sign-in and commit identity. You need access to the demo repository. Ask for help if authentication is not ready.
- In VS Code, choose Terminal → New Terminal to check Git below. The next section explains exactly where to create your project folder and run the clone command.
- Keep this guide and GitHub open beside VS Code. Run commands one line at a time and read the output.
git --versionA version number means Git is available. If the command is not found, install Git using the link above, restart VS Code, and ask for help if it still fails.
How to open and preview Markdown in VS Code
Use File → Open Folder… to open your cloned adventure-demo folder. In Explorer, select New File to create a file at the root of the repository. Save with ⌘S on Mac or Ctrl+S on Windows/Linux.
With a .md file open, open the Command Palette with ⌘⇧P or Ctrl+Shift+P. Run Markdown: Open Preview to the Side. Click each story link in the preview and confirm it opens the right scene.
You committed on your laptop. Can your teammate see that commit on GitHub?
Create a shared starting point
Give everyone the same first commit before any branch starts its own adventure.
1. Create the repository on GitHub · owner only
- Sign in to GitHub. In the upper-right corner, open the + menu and choose New repository. You can also open the Create a new repository page.
- Under Owner, select the account that will own this demo. Under Repository name, enter
webdev4-git-live-demo. If that name is already in use in your account, use an unused name such aswebdev4-git-live-demo-2; use the actual name consistently when sharing its URL. - In Description, enter: MTM6407 Week 1: a collaborative Markdown story for practising branches, pull requests, and merge conflicts.
- Choose the visibility indicated by the professor. Leave Add README off, choose No .gitignore, and choose No license (or leave those starter checkboxes unchecked if your layout uses checkboxes). Select Create repository.
2. Find the new-file link and write intro.md · owner only
- On the new repository’s page, select the Code tab at the top if it is not already selected.
- Scroll past the Start coding with Codespaces and Add collaborators to this repository cards, if shown. Find the box headed Quick setup — if you’ve done this kind of thing before.
- Look directly below the HTTPS / SSH repository address in that box. The sentence starts Get started by. Click the small blue creating a new file link. It is a text link, not a large button.
I don’t see “creating a new file”
- The repository is empty: press ⌘F on Mac or Ctrl+F on Windows/Linux, search for creating a new file, and press Esc to close Find. Click the highlighted link in Quick setup.
- You already see a file list: the repository has an initial commit, so Quick setup may be gone. Above the file list, choose Add file → Create new file. In a compact layout, Add file may appear as a + icon above the file list; this is different from the global + menu in GitHub’s header. If
intro.mdalready exists, open it and use the pencil icon to edit it instead of creating a duplicate. - No editing controls appear: confirm that you are signed in, on the repository’s Code tab, and viewing the correct owner/repository. The owner creates this first file. A teammate must accept the invitation before editing. If GitHub offers to fork the repository, stop and ask the professor to check your access; this demo uses one shared repository.
- In the file editor, find the filename field at the top, often labelled Name your file…. Enter exactly
intro.md: lowercase, no spaces, and no folder name before it. - Click Copy on the story block below. Click the large text editor under the filename and paste with ⌘V or Ctrl+V. If there is existing text in the editor, select that text first and replace it. Keep the
#, blank line, and final question exactly as shown. - Choose Preview above the editor if available. Expect a heading, “The lights go out.”, and “What do you do next?” There should be no forest or tower choices yet.
# The silent station

The lights go out.
What do you do next?
3. Save the first commit · owner only
- Above the editor, choose the green Commit changes… button. This opens the commit dialog; the file is not saved to the repository yet.
- In Commit message, replace the suggested message with Start the station story. The extended description can stay empty.
- If GitHub shows branch options, choose Commit directly to the current branch (normally
main). If its name differs, finish this first commit, then follow The first branch has a different name below before anyone clones. Do not create a feature branch or pull request for this starting file. An empty repository may not show branch options. - Choose the green Commit changes button inside the dialog. Wait for GitHub to return to the repository or file page.
- Select the repository’s Code tab. Confirm that
intro.mdappears in the file list and that the branch selector above the list saysmain. Openintro.mdand check the three story lines again. Everyone must start from this same committed version.
The first branch has a different name
GitHub may use your account’s default branch name. Before anyone clones or creates a feature branch, the owner can rename this new repository’s first branch to main.
- On the Code tab, open the branch selector above the file list and choose View all branches.
- Find the current default branch. Open its … menu and choose Rename branch (or the rename pencil icon if shown).
- Enter
main, choose Rename branch, and return to Code to check the selector. If anothermainalready exists or renaming is restricted, stop and ask the professor before continuing.
4. Give your partner access · pairs only
- The owner opens the repository’s Settings tab, then Collaborators in the left sidebar. GitHub may ask the owner to confirm their sign-in.
- Choose Add people, enter the partner’s exact GitHub username, select the correct account, and choose Add [username] to this repository.
- The invited partner signs in to their own account and accepts the repository invitation from their GitHub notification or invitation email. The owner checks that the invitation is no longer pending.
- Share this repository’s URL with the partner. Both contributors work in this same repository; the partner does not create another repository or a fork. A public repository can be read by anyone, but a collaborator invitation is still needed to push changes.
Working alone? Skip invitations. The owner already has access and does not invite themselves.
5. Clone into VS Code · each contributor
- On GitHub, return to the repository’s Code tab after the first commit. Above the file list, open the green Code button. In its Local tab, choose HTTPS, then use the copy icon beside the address ending in
.git. - Paste that address into the field below to prepare your clone command. Use the shared repository’s HTTPS URL, not a file page, password, or token.
- On your computer, use Finder on Mac or File Explorer on Windows to create a folder named
MTM6407inside Documents if you do not already have one. - In VS Code, choose File → Open Folder…, select Documents → MTM6407, and open it. This is the parent folder. Do not create
adventure-demoyourself; Git will create it. If that folder already exists from an earlier attempt, ask the professor to help inspect or reuse it before continuing. - Choose Terminal → New Terminal in VS Code. Run the generated
git cloneline below and wait for it to finish. Complete the browser sign-in if your configured Git authentication opens one. Only after the clone succeeds, runcd adventure-demo.
Used only on this page. Copying the clone command becomes available when the URL is valid.
git clone <repository-url> adventure-demo
cd adventure-demo- In VS Code, choose File → Open Folder… again. This time select Documents → MTM6407 → adventure-demo and open it. In the left-hand Explorer, you should now see
intro.md. - Choose Terminal → New Terminal inside this opened repository folder. Run the checks below. Expect
main, a clean working tree, and the shared GitHub repository URL fororigin. If any check differs, ask the professor before creating a branch.
git branch --show-current
git status
git remote -v
6. Create and publish Mara’s branch · Mara only
Following along alone? Run this block now. Working as a pair? Only the person playing Mara runs it. Leo keeps their own clone on main and waits until Merge the tower path first. Do not publish two copies of Mara’s branch from separate clones.
git switch -c demo/mara-forest
git push -u origin demo/mara-forest
git branch --show-currentPropose the forest path
Create a change your teammate can review: one new choice and the page it opens.
1. Check the branch, then edit
git status
git branch --show-current
Confirm demo/mara-forest. In VS Code, replace all of intro.md with the first block. Create forest.md beside it and paste the second block. Save both files.
# The silent station

The lights go out.
[Enter the forest](forest.md)# The forest
A narrow path leads between the trees. Footsteps stop when you stop.[Enter the forest](forest.md) is a relative Markdown link: the brackets hold the label and the parentheses hold the destination filename. Preview intro.md in VS Code and follow the forest link.
2. Inspect, stage, commit, and push
git diff
git add intro.md forest.md
git diff --staged
git commit -m "Add forest choice and scene"
git pushgit diff shows changes to tracked files; the new forest.md appears in git status before staging. After git add, check git diff --staged for both the link and the new scene. If Git opens a scrolling view, press q to return to the prompt.
3. Open Mara’s pull request on GitHub
- Choose Pull requests → New pull request.
- Set base: main and compare: demo/mara-forest, then choose Create pull request.
- Use the title and suggested description below. Only keep the testing claim after actually checking the link.
- Below the description, choose the green Create pull request button to submit the form. Confirm the new PR page shows Open. Filling in the form alone does not open the PR.
Add the forest pathAdds a forest choice to intro.md and a new forest.md scene.
Checked: I opened intro.md on demo/mara-forest and followed the forest link to the new scene.Open Files changed to inspect the difference. Then browse the repository on demo/mara-forest, open the rendered intro.md, and test the link there too.
Has opening Mara’s pull request changed main?
Merge the tower path first
Leo starts from the original story and changes the same line. Main still has no forest choice.
1. Create Leo’s branch from original main
git status
git switch main
git switch -c demo/leo-tower
git push -u origin demo/leo-towerCheck that intro.md still asks “What do you do next?” Replace it with Leo’s version and create tower.md in the same folder. Save and preview the tower link.
# The silent station
The lights go out.
[Climb the tower](tower.md)# The tower
A spiral staircase rises above the tracks. A light flashes from the top window.git diff
git add intro.md tower.md
git diff --staged
git commit -m "Add the tower choice and scene"
git push origin demo/leo-tower2. Open and review Leo’s PR
On GitHub, choose Pull requests → New pull request. Set base: main and compare: demo/leo-tower, then choose Create pull request to open the form. Fill in the title and description below after checking the story link. Choose Create pull request again below the description to submit the form. Confirm that the PR page says Open.
Add the tower pathAdds a tower choice to intro.md and a new tower.md scene.
Checked: I opened intro.md on demo/leo-tower and followed the tower link to the new scene.- A real teammate opens Files changed. Check filenames, the exact link target, and whether the scene makes sense.
- Open the story on
demo/leo-towerand follow the tower link. Looking at main would show the older story. - Give specific feedback. To submit a formal review, choose Review changes, select the appropriate review option, and choose Submit review. Pending review comments are not shared until submitted.
- If something needs fixing, the author edits on
demo/leo-tower, commits, and pushes. The same PR updates.
Visual help: where to submit a GitHub review

On your teammate’s pull request, inspect Files changed, choose Review changes, and submit the appropriate review. Review the actual story links as well as the text difference.
3. Merge Leo first
- After review, choose Create a merge commit from the merge options, then Merge pull request → Confirm merge. This demo uses merge commits throughout.
- Confirm that the PR says Merged, then choose Delete branch for
demo/leo-tower. - Open
intro.mdon GitHub’smain. The tower choice is present. Return to Mara’s open PR and inspect its conflict status.
Keep both paths
A conflict is a decision point. Write a combined introduction that gives the reader both choices.
1. Bring shared main into Mara’s branch
git status
git switch demo/mara-forest
git status
git fetch origin
git merge origin/mainBegin with a clean working tree. The last command should stop with a content conflict in intro.md. tower.md normally arrives and stages automatically. The merge is still unfinished.
2. Read the conflict markers
Open intro.md in VS Code’s text editor. If the merge editor opens instead, you can right-click the file in Explorer and choose Open With… → Text Editor to inspect the raw text.
# The silent station
The lights go out.
<<<<<<< HEAD
[Enter the forest](forest.md)
=======
[Climb the tower](tower.md)
>>>>>>> origin/mainMara’s forest choice, because you are on demo/mara-forest.
The tower choice fetched from shared main. These labels depend on the direction of this merge.
What belongs in the finished introduction?
3. Resolve the file
Propose the finished text first. Then expand the reference below and replace intro.md with the combined version. Leave forest.md and tower.md intact.
Reveal the combined introduction
# The silent station
The lights go out.
What do you do next?
- [Enter the forest](forest.md)
- [Climb the tower](tower.md)Save the file. Preview it in VS Code and follow both links. Confirm there are no <<<<<<<, =======, or >>>>>>> markers left.
Visual help: VS Code’s optional 3-way merge editor
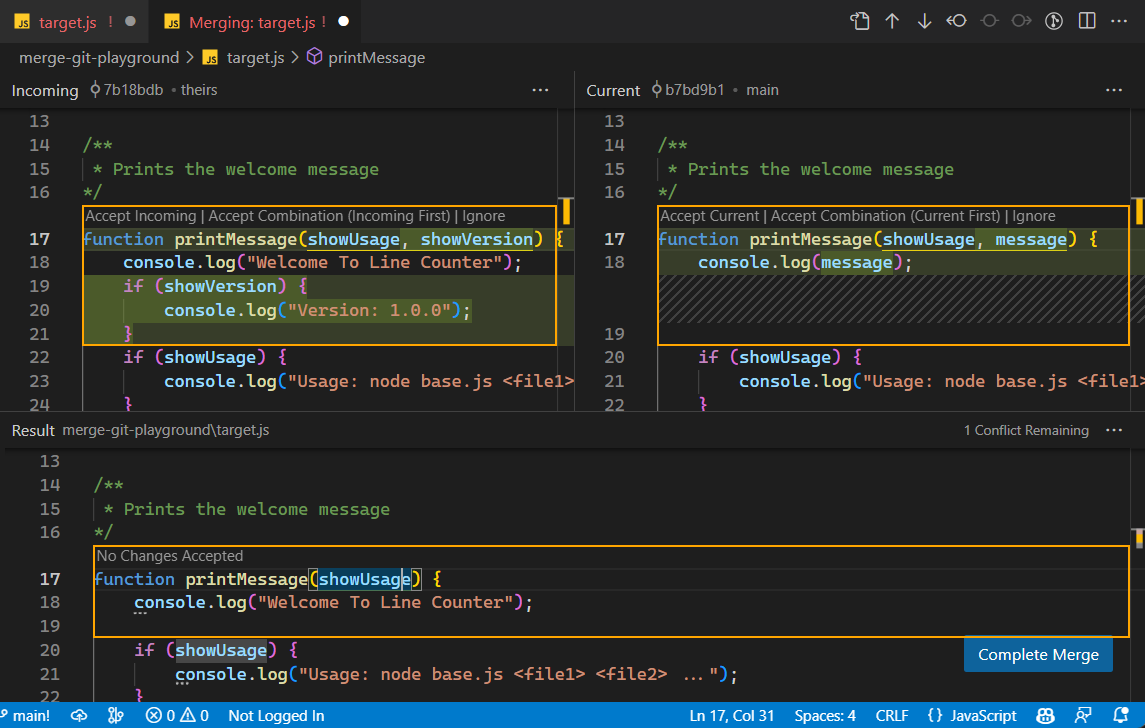
Open the conflicted file from Source Control and choose Resolve in Merge Editor. Compare Incoming and Current; edit Result to match the combined introduction above. Complete Merge stages the resolved file. Continue with the inspection and commit commands below.
Accepting both changes may still need editing. Restore the question and format each choice as its own list item.
4. Finish and share the resolution
git diff --check
git add intro.md
git diff --staged
git diff --staged --check
git status
git commit -m "Resolve story choices"
git pushCheck the staged result before committing. The checks should report no problems. On GitHub, open Mara’s existing PR: it updates automatically. Review its current difference and test both story links on demo/mara-forest.
Merge, clean up, and sync
Bring the reviewed story into main and update the copy on your computer.
1. Finish Mara’s PR on GitHub
- Review the updated Files changed and test both links on the proposed branch. Use a real teammate for any required approving review.
- Use Create a merge commit, then confirm the merge. Check the PR says Merged.
- Choose Delete branch for remote
demo/mara-forest. - Open
intro.mdon GitHub’s main and follow both paths.
2. Update local main
git status
git switch main
git pull --ff-only origin main
git fetch --prune originIf git status shows unfinished work, stop before switching. After the pull, local main should contain both story choices.
3. Delete only the completed local branches you own
For the single-clone instructor demo, both branches exist locally:
git branch -d demo/mara-forest
git branch -d demo/leo-tower
git status| Action | What it changes |
|---|---|
| GitHub: Delete branch | Deletes the completed branch on the remote. |
git pull --ff-only origin main | Moves your current local main forward, or stops if histories have diverged. |
git fetch --prune origin | Removes stale remote-tracking names on your computer. |
git branch -d … | Deletes a merged local branch. Its merged story remains on main. |
Make one more contribution
A one-sentence change gets the same care: a fresh branch, a clear commit, a pull request, and a review.
1. Start from updated main
git status
git switch main
git pull --ff-only origin main
git switch -c demo/mara-editReplace only forest.md with the version below. It adds one lantern sentence. Save and preview the forest scene.
# The forest

A narrow path leads between the trees. Footsteps stop when you stop.
In the distance, a lantern moves between the trees.2. Inspect, commit, and publish the new branch
git diff
git add forest.md
git diff --staged
git commit -m "Add a lantern detail to the forest scene"
git push -u origin demo/mara-edit3. Repeat the PR and review cycle
On GitHub, choose Pull requests → New pull request. Set base: main and compare: demo/mara-edit, then choose Create pull request. Fill in the title and description below after checking the forest path. Choose Create pull request again below the description to submit the form, and confirm that the PR says Open.
Add a lantern detail to the forest sceneAdds a lantern sentence to forest.md.
Checked: I opened intro.md on demo/mara-edit, followed the forest path, and confirmed the new sentence appears.Review Files changed and the forest path on the branch. Merge using Create a merge commit, confirm Merged, and delete remote demo/mara-edit.
4. Finish locally
git status
git switch main
git pull --ff-only origin main
git fetch --prune origin
git branch -d demo/mara-edit
git status
git log --oneline --graph --decorate -10Open the final intro.md, follow both paths, and check the new lantern sentence. Your working tree should be clean. The graph shows the contribution history; press q if the log opens in a pager.
Your team’s adventure
Now apply the workflow to a story your team creates. Work in a group of 3 or 4, use one repository, and complete two contribution cycles per person.
- 1
Setup
Create the shared repository and
intro.md. Arrange collaborator access and accept invitations. Create each member’s branch from the shared starting point. - 2
Expand
Each member adds a new path and opens one pull request. Keep the link and destination file together in the contribution.
- 3
Review
Review each other’s work, resolve any conflicts, merge, delete completed branches, and synchronize main.
- 4
Edit
Each member starts a fresh branch from current main and makes one small story change. Commit, push, and open another PR.
- 5
Review and submit
Review and merge the second-round changes. Delete completed branches, sync main, test the story, and submit the repository URL.
Names that tell your team what changed
Use your GitHub username in assignment branches. The examples below illustrate the pattern; replace the username and story topic with your own.
| Item | Example |
|---|---|
| First-round branch | YOUR-USERNAME/forest |
| Second-round branch | YOUR-USERNAME/forest-edit |
| Scene filename | forest.md (lowercase and descriptive) |
| Commit / PR title | Add the forest path |
| PR description | Explain the change and the specific story links you checked. |
The demo repository name and demo/mara-forest branches are classroom examples. Follow Brightspace for any additional repository naming, visibility, story, rubric, or submission requirements.
Before your team submits
- Every member, including the leader, completed both contribution cycles.
- Your team reviewed and merged the intended PRs.
- The story on main has working relative links, exact filenames, and no conflict markers.
- Completed branches are cleaned up and team members synchronized main.
- The repository is accessible as required by the assignment, and you have the correct URL to submit.
When Git has questions
Read the message first. It is usually telling you which assumption needs checking.
The clone folder already exists
Use a fresh parent folder or another deliberately chosen unused folder. Do not delete an existing clone to make the command work.
Authentication failed or permission denied
Check the intended account, whether the collaborator invitation was accepted, and your established sign-in method. GitHub HTTPS authentication does not use your account password for Git operations. Ask the professor for help with your configured sign-in. Never paste passwords or tokens into the story, PR, or a screen-shared command.
Git asks me who I am
The demo assumes an existing configured commit identity. Pause and ask for setup help. Do not change global identity settings just to play Mara or Leo; they are teaching roles.
The branch name is wrong or already exists
Inspect git branch and git branch --show-current. Confirm your repository is the new demo and its starting branch is main. Preserve existing work and ask for help instead of deleting branches.
There is nothing to compare in my pull request
Publishing a branch before adding a commit gives it no difference from main. Check that you edited on the intended branch, saved, committed, and pushed the story changes.
The expected conflict did not happen
For this demo, both branches must start at the original main and replace the exact same question line differently. Leo must merge first. Inspect that sequence or compare the supplied conflict snapshot. Do not manufacture a conflict in your assessed team work.
I have unfinished changes before switching or merging
Inspect git status. Save and preserve your work, then ask for help. Do not force a switch, hard reset, or force push.
I need to start the conflict resolution again
While this merge is still in progress, git merge --abort can return to the pre-merge state. It is appropriate for this demo because you started the merge with a clean working tree. Ask for help if that condition is not true.
pull --ff-only refuses to update
Your local main may have diverged or another state needs attention. Keep the exact error and inspect the history with the professor. Do not replace this command with a hard reset or force push.
branch -d refuses to delete
Check that the PR merged, local main is up to date, and the merge used Create a merge commit. Squash or rebase merges can change Git’s ancestry checks. Keep the branch until the reason is understood.
A review rule blocks merging
Use an eligible real reviewer and follow the repository rules. The author cannot approve their own PR. Do not disable rules to make a classroom step appear complete.
A story link fails
Compare the link target with the exact filename, including capitalization and folder. Confirm you are viewing the proposed branch. Fix the file on that feature branch, save, commit, push, and review again.
Git opens a scrolling screen
Commands such as git diff and git log can use a pager. Press q to return to the terminal. Do not type the next Git command into the pager.
GitHub is unavailable
Use the downloadable snapshots to compare the starting point, branch versions, conflict, and resolution in VS Code. These files illustrate the story states; they do not create GitHub PRs or record reviews. Return to GitHub to complete those steps when it is available.
Your “where am I?” toolkit
git status
git branch --show-current
git branch
git remote -v
git diff
git diff --staged
When asking for help, share the step number, current branch, and exact error. Keep credentials out of screenshots.
Keep these within reach
Use the exact story snapshots as a reference while you practise.
Week 1 story snapshots10 Markdown files · ZIP · start, branches, conflict, resolution, and second editCopy only the contents of the named file when the relevant step tells you. Do not add the numbered snapshot folders to your story repository. Keep the resolution closed until you have proposed your own answer.
About this guide
Adapted from the professor’s Web Development IV Week 1 Git & GitHub Animated v4 presentation, live-demo README, speaking notes, and original story snapshots. The demo follows slides 12–17; the assignment overview follows slides 18–20. Brightspace remains the starting point for current course instructions and submissions.
The interface adds personal checkpoints, short questions, visual explanations, and suggested PR descriptions. Checkmarks stay in this browser when storage is available; they are not sent to the professor. Future weekly guides will be added as they are released.
The VS Code image is an official Microsoft documentation example. The GitHub review image is from GitHub Docs under CC BY 4.0. Both sources are linked at the point of use. Story text is the supplied fictional classroom example.